Solution Recipes are tutorials to achieve specific objectives in Klaviyo. They can also help you master Klaviyo, learn new third-party technologies, and come up with creative ideas. They are written mainly for developers & technically-advanced users.
Note: We do our best to make sure any code and API references are accurate and current when this is published, but you might need to update code and it’s always a best practice to leverage ourlatest API versions. If you have questions, feel free to hop over to ourDeveloper Community.
How to send Slack notifications via a Webhook action in Klaviyo Flows.
If your team already uses Slack for internal communication, it may be a great option to use Slack for day to day workflows & processes. Imagine notifications sent right to your Sales team Slack channel when a new lead subscribes to your brand. Or a Slack notification each time a customer hits a new milestone.
Beginner
Introduction and challenge
If you’re familiar with Klaviyo Flows, you know how straightforward it is to configure a series of automated messages— such as emails & texts — based on a trigger action like a list subscription or qualifying event. But what if you wanted to notify your team via Slack when someone performs that triggering action or hits a milestone that demands a more personalized touch like a care package or phone call? Posting automated, dynamic messages to Slack gives your team greater visibility around real-time activity of your customer base. To illustrate just how simple this is to configure, I’ll show you how to set up a List-triggered Flow to automate a Slack message via Klaviyo’s Webhook action, but it’s worth emphasizing that this can be generalized to apply to any Flow, at any point within the Flow.
In this recipe we’ll explore (1) creating a Slack app to generate a corresponding Webhook URL, (2) setting up a List-triggered Flow & (3) configuring a Webhook action that sends a notification to Slack.
Ingredients
- 1 Slack app (will walk you through this step!)
- 1 Klaviyo subscriber List
- 1 List-triggered Flow with Webhook action
Instructions
Step 1: Create your Slack app & generate your unique Webhook URL.
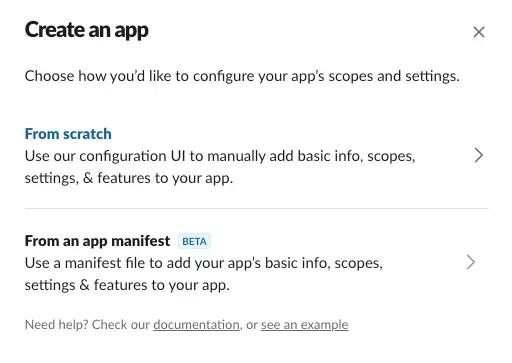
Create a Slack app by navigating here & selecting Create New App. I selected to build this From Scratch because I don’t need to add any content or interface for the app — I simply need the Webhook URL.

Make sure to choose a relevant name for your App, as this will be the from-name used for incoming Slack notifications. For that reason, in my example, I named my app “Incoming lead from Klaviyo”. You will see in step #4 how this all ties together!
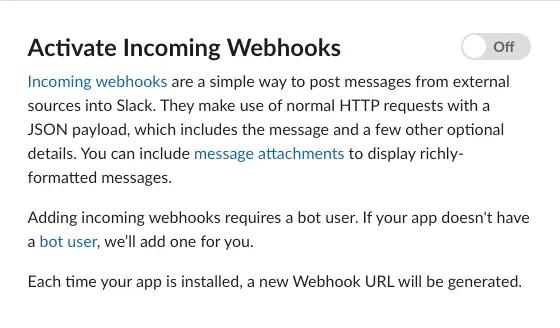
Navigate to Incoming Webhooks from the left panel under Features. Toggle to enable Webhooks.

Now that Webhooks are enabled for your app, click Add New Webhook to Workspace to generate the corresponding Webhook URL.

Keep this URL safe & secure! Treat this URL like a private key in Klaviyo & do not share it publicly. We’ll get back to this URL in step #3.
Step 2: Create your List-triggered Flow.
Navigate to your Flows view in Klaviyo. If you need a refresher on how Flows work in Klaviyo, check out Getting Started with Flows. As noted, this approach works for any Flow, but we’ll illustrate the concept with a List-triggered Flow.
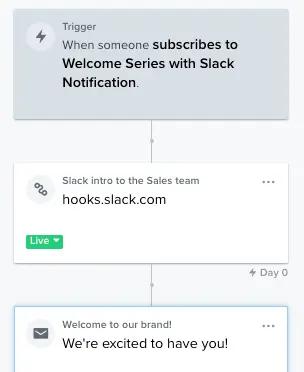
You can either use an existing Welcome Series Flow, or create a new List-triggered Flow with the subscriber List as your Flow trigger. If you don’t have an existing subscriber List, you’ll create one first in Klaviyo. Consider whether this List should be configured as double or single opt-in. If double opt-in, the new subscriber will be prompted to confirm their subscription via email prior to joining your List.
Step 3: Configure your Webhook action.
If you don’t already have two-step authentication enabled, you will need to do so prior to using the Webhook action. Once two-step is enabled & you have your Flow configured, you will drag in a Webhook action. Remember, you can locate the Webhook action wherever you want in the Flow.
In this particular use case, we want to drag the Webhook action right under the Flow trigger so it’s the first step of the Flow.

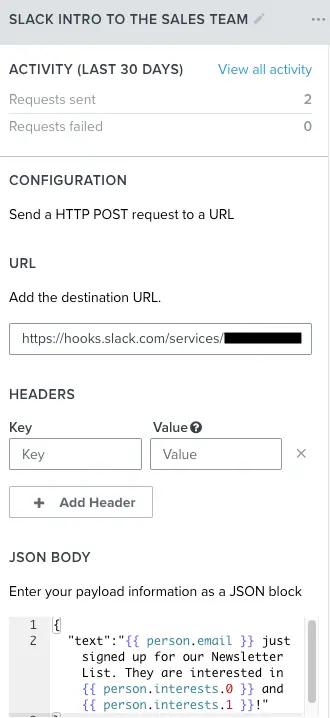
For the destination URL, we’ll use the Webhook URL we generated in step #1. In the JSON body, you will include a text parameter in quotes followed by the relevant details you want to send in that Slack notification, also in quotes. Here’s the example JSON body I used:
{
"text":"{{ person.email }} just signed up for our Newsletter List. They are interested in {{ person.interests.0 }} and {{ person.interests.1 }}!"
}
In my example, I’m including the subscriber’s email address & a custom “interests” property to illustrate how you can use dynamic content, but you can personalize this even further. Think: signup form responses or location details. Just make sure to use the appropriate templating syntax such as variable tags for each property.

Step 4: Set your Flow live.
I’d recommend clicking Update Action Statuses at the top right of your Flow. This is where you can set each element in your Flow live with a single click — & that’s it! Set it & forget it. Once a new lead comes in & is added to the subscriber List (including double-opting in, if applicable), you’ll see your Slack app post notifications to the channel of your choosing.

Impact
With your Flow up & running, you’ll begin seeing Slack notifications each time a new subscriber is added to your List (or however you configured your Flow logic). Klaviyo-generated Slack notifications create greater visibility & scalability for your team’s day to day processes. Now you can divvy up new leads & converse on high priority requests with ease.
Better yet, you can apply this same approach to other Flows to trigger a message to your team when customers hit key milestones, make large purchases or returns, share positive / negative reviews, & much more!
Learn more
If you’re interested in learning more about Klaviyo’s developer experience & capabilities, please visit developers.klaviyo.com!
