Solution Recipes are tutorials to achieve specific objectives in Klaviyo. They can also help you master Klaviyo, learn new third-party technologies, and come up with creative ideas. They are written mainly for developers & technically-advanced users.
Note: We do our best to make sure any code and API references are accurate and current when this is published, but you might need to update code and it’s always a best practice to leverage ourlatest API versions. If you have questions, feel free to hop over to ourDeveloper Community.
How to dynamically use content from Google Sheets in Klaviyo emails.
This can enable lots of use cases from language localization to personalized banners to curating product reviews — and more. It is very versatile and straightforward to implement.
Low to moderate
Introduction
Klaviyo allows you to dynamically reference a variety of data sources in email templates to create highly personalized experiences. You can include context about an event, like referencing items in a “Placed Order” metric, or you can reference profile properties, like birthday. You can include product information via drag-and-drop Product Blocks or via programmatic Catalog Lookups. And you can dynamically insert content from an external data source, like an RSS feed or a feed of product reviews, even doing this in a way that conditionally varies per recipient by using web feeds and an email templating language called Django.
Sometimes though, you might want to create content yourself that lives external to Klaviyo and use it in email templates. Here, we showcase how you can do this easily via Google Sheets and how you can use that content in Klaviyo emails to unlock creative use cases.

Challenge
There are a number of real-life scenarios where customers want to dynamically personalize email templates using manually-created external content. Here, we’ll address the following challenge a customer faced around language localization:
Customer A wants to serve up email copy in different languages depending on the recipient’s country and expects the copy will be applied to multiple email templates while also changing regularly.
If the requirement were to simply vary some email content per recipient, it’s straightforward in Klaviyo to use the show/hide feature of email templating blocks to render some content to one group of people and other content to other groups, conditioned on the value of a profile property.

Alternatively, if it’s an email in an automated flow — i.e. an automated series of emails — you could send users down different branches for each country or group of countries, each with a template in a different language.
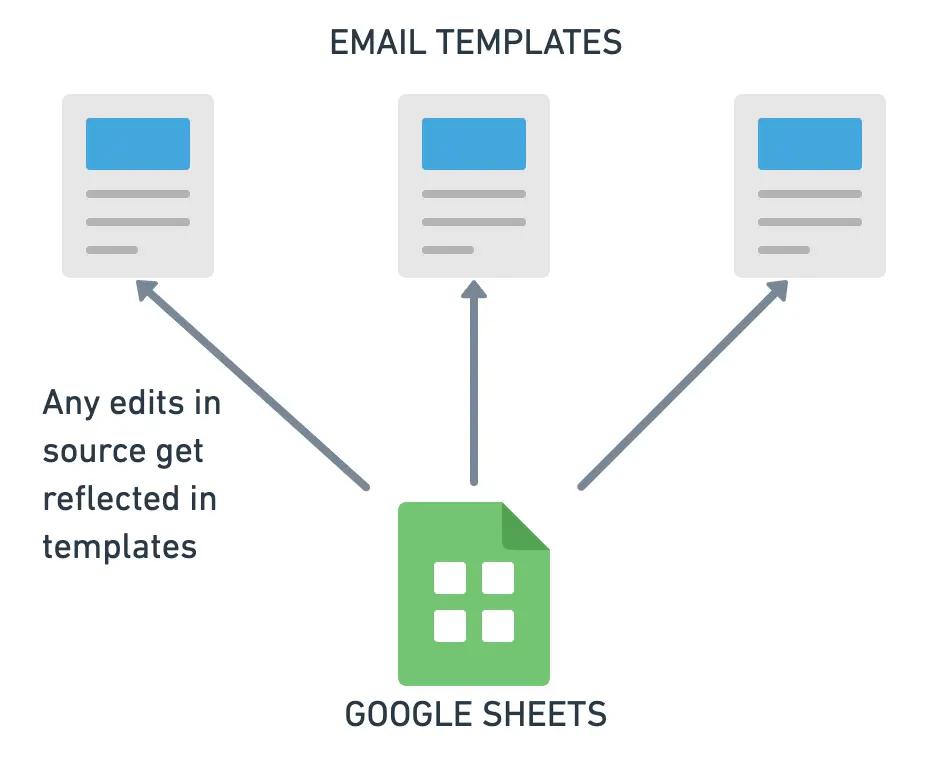
But, the challenge here is more nuanced. In this case, the customer required that the content be easily editable by a marketer from a single place (since it will be changed regularly) while also requiring that any changes be reflected in multiple emails in real-time (since the same content will be applied to multiple templates). Moreover, in this case, the customer preferred to store the translated copy in an external table since the people responsible for translating the copy didn’t all have access to Klaviyo. Is this possible?
Or, to give another example of the same general challenge: We recently collaborated with the team at Modular Marketing who were working with a Klaviyo customer that wanted banners in their templates to update dynamically across all emails, but the customer needed the ability to update that content outside of Klaviyo. How could they achieve this?
Good news: this is both straightforward and really flexible using something as simple as Google Sheets. Below, we’ll walk through how you can achieve this, focusing on the language localization example.
Ingredients
- 1 Google Sheets workbook
- 1 Klaviyo web feed
- 1 or more Klaviyo email templates, including intermediate level knowledge of the Django templating language
Instructions
Step 1: Set up Google Sheet
The first step is to organize source content into Google Sheets. For example, we could create a simple table in Google Sheets that includes a column for language preference and a column for email copy. We’ll call the former languagePreference and the latter emailCopy.
Thinking ahead for a moment as to how we’ll use this in email templates (Step 4), we will also need to have a field on the recipient’s profile that allows us to determine which languagePreference should apply. We’ll use the Country property that Klaviyo collects automatically via IP geolocation and we’ll create logic in the email template that takes Country and pairs it with a corresponding languagePreference. (Side note: read more on how Klaviyo sets location). Alternatively, you could create your own profile property to use that reflects language preference, e.g. Preferred Language, either by instrumenting the website with Javascript or by creating segments in Klaviyo and using a segment-triggered flow to automatically set a profile property value. Finally, you could explicitly collect language preference via a Klaviyo form. Again, in this example, we’ll use the Country property that Klaviyo automatically collects.
To keep it simple, we’ll use just two languages in our example but the same approach can be easily extended to cover any number of languages. Here’s an example Google Sheet containing sample content and a screenshot of what it looks like.

Step 2: Publish Google Sheet
So we’ve set up a Google Sheet and we now need to publish this in a particular format to a persistent URL so it can be used in Klaviyo. Specifically, Klaviyo web feeds can ingest content organized into JSON or XML format. While Google allows you to publish the content from the sheet as JSON, the resulting data is organized in a cumbersome, difficult-to-read way — which makes it very difficult to reference in an email template.
Fortunately, there is a solution. GSX2JSON.com provides a free service that will convert your Google sheet content to a more traditional and readable JSON structure, allowing you to traverse the content by row or column. In engineering lingo, they provide an API endpoint that will take the unique ID of your Google Sheet, fetch the content from Google’s APIs, transform that content into a more readable JSON format, and return it. That’s exactly what we want to do.
So, all you need to do is publish your Google Sheet to the web, copy the unique ID for the sheet and append it as a parameter on a URL, which is all well-documented at GSX2JSON.com.
The end result is that you will have a URL like this which returns readable JSON from your Google Sheet. You can test this works simply by navigating to the URL in a browser. You’ll see that it serves up the content of the Google Sheet in JSON format.

This is what you’ll need for the next step.
Step 3: Configure web feed in Klaviyo
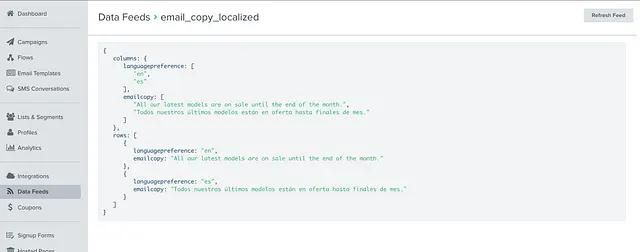
Now that you have a JSON-formatted web feed that is accessible at a persistent URL, you can configure this as a web feed in Klaviyo. So, this step is really simple. Just follow our instructions to Add a Web Feed. You’ll give your feed a name and add the URL from the step above. Here we call it email_copy_localized. Try selecting “Preview” to make sure it’s configured correctly. You should see the contents from the feed appear.

Minor note: Be aware that the GSX2JSON service will modify the column names by lowercasing them and removing any whitespace. For example, a column name input as emailCopy will be output as emailcopy. You can see this in the feed preview above. This is helpful to know before you get to the next step, because you’ll need to reference these in email templates.
Step 4: Create email template
So, we’ve created the content in Google Sheets, published it in standardized JSON to a URL, and configured a web feed in Klaviyo using that URL. All that’s left to do is reference this content in an email template.
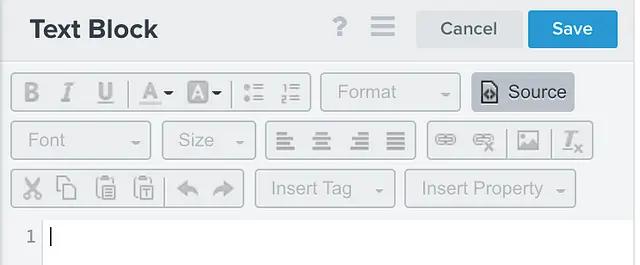
In this case, we want to display the en content to recipients with a Country that speaks English and the es content to recipients with a Country that speaks Spanish. Following the guidelines for how to use web feeds in an email, we’ll add a Text Block to the email and click on the Source button to add some templating code.

The specific code we add should essentially tell Klaviyo to find the recipient’s Country and then loop through the contents of the feed and match on a languagepreference we specify that makes sense for that country. If it finds a match, we want it to display the corresponding value for emailcopy. As a fallback, we’ll have it display English.
In this case, for simplicity, we’ll only match on a few selected countries, e.g.United States and Canada for English and Spain or Mexico for Spanish. But this can be easily extended by adding more countries with additional or statements. If you need to figure out what values exist for the Country property, a helpful way to determine this is by creating a location-based segment and taking note of the values that appear in the drop-down when you select Country as a filtering condition.

In this case, here’s what we’ll add into the Source of the text block.
{% with feeds.email_copy_localized as feed %}

  {% if person.Country == "United States" or person.Country == "Canada" %}
    {% for row in feed.rows %}
      {% if row.languagepreference == "en" %}
        {{ row.emailcopy }}
      {% endif %}
    {% endfor %}

  {% elif person.Country == "Spain" or person.Country == "Mexico"%}
    {% for row in feed.rows %}
      {% if row.languagepreference == "es" %}
        {{ row.emailcopy }}
      {% endif %}
    {% endfor %}

  {% else %}
    {% for row in feed.rows %}
      {% if row.languagepreference == "en" %}
        {{ row.emailcopy }}
      {% endif %}
    {% endfor %}
  {% endif %}

{% endwith %}
To break this down a bit:
- The with statement provides a way to take a complex variable, in this case the reference to the feed feeds.email_copy_localized, and provides a simpler name for referencing it. In this case, feed. Any reference to
feedbelow is a way to reference the web feed we configured. - Each subsequent block of code is organized around a conditional related to the recipient’s Country. The first block applies if Country equals United States or Canada; the second applies if Country equals Spain or Mexico; and the third is a fallback in case Country is not set, or has another value that our code hasn’t contemplated.
- Within each block, there is a for loop with a nested if statement. The for loop iterates through each row in the feed and the if statement evaluates whether that row’s languagepreference field matches a particular value. For example, when nested underneath the block that applies to United States and Canada it looks for a languagepreference being equal to en. If there is a match, we render the corresponding value for emailcopy.
There are other ways you could organize this code or achieve this same outcome. For example, we could break this out into separate templating blocks (rather than using a single block) and, for each, we could apply if logic using the show/hide feature. In this case, however, I have organized the code into a single templating block because the customer preferred to have a single saved block that could easily be added to multiple templates. The code could also be written more efficiently by changing the order of how we use for loops and if statements, but this implementation has the benefit of being more intuitive and readable.
Of course, once we have this logic to generate the right content in the email, we might want to add more styling. For example, we could wrap all of this in <h1>…</h1> tags to make it display as heading or could apply additional styling with CSS.
Step 5: Preview and confirm it works
The final step is to validate that your code is behaving as intended. Fortunately, Klaviyo makes this step pretty easy, providing multiple ways to preview emails. In this case, you might want to have a list that includes a set of profiles, each of which has different values for Country. This would allow you to efficiently but thoroughly confirm that your email copy is rendering as intended for each target audience.


In this case, looks good 😎
Final Thoughts
It’s worth emphasizing that what we’ve implemented here is just a special case of a more general solution and what we’re trying to highlight is that Klaviyo can be really flexible. You can dynamically reference any content in Google Sheets in one or many email templates and the changes will take effect in real time — i.e. the changes will be rendered into any email that is sent subsequent to the changes being made (they don’t apply retroactively).
If you wanted to take this to the next level and get really creative, think about all the information that you could populate into Google Sheets — e.g. could you have a curated set of product reviews or testimonials in there? Did you know you can use Zapier to connect to other services and automatically populate data into Google Sheets? Could you use formulas in Google Sheets to filter, concatenate, or enrich content from elsewhere in the sheet, or another sheet? Lastly, the Django templating language is built to accommodate a ton of flexibility and Klaviyo offers a helpful guide, so you can also get creative with how you use this information within email templates. There are nearly unlimited possibilities. Enjoy!
